McCall 7199 – Asymmetrical Zip Outerwear

mccall7199-1

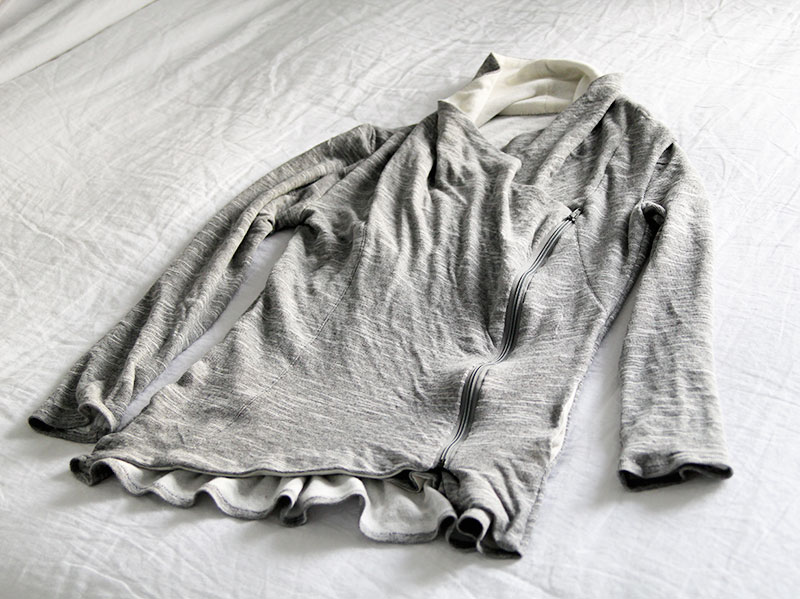
I think my body might be shrinking. Or not. Maybe I’m not understanding what “moderate stretch knits” are, since I didn’t think the fabric I used was crazy stretchy.

This is what the envelope image of McCall 7199 view A looks like:

mccall-7199-9

This is how it looks on me:

mccall7199-4

I cut the size 12 and made no mods other than making the hem slightly longer to account for my generous torso length (I folded up 3/8″ instead of 1″). I actually like the loose fit, but it might have been a good idea to go down one more size. I feel like I’m writing this sentence a lot lately. I’m having a bear of a time figuring out the right sizing for myself with so many different pattern companies and very little standardization. Throw in the quirks of each fabric, and I’m constantly scratching my head.

There’s a lot to love here. The double knit is super luxe and soft. I think it’s a sweater knit? I’m just going to put it out there that from here on out, chances are good that I won’t remember where any of the fabric I’m using is from nor am I adept at identifying types of substrate. I’m sorting through stash from years ago at this point and my memory isn’t great on the best of days. That’s why I have to write about my projects right away; otherwise I won’t even be able to remember that I actually made the thing.

mccall7199-2

Anyway. I’m drawn to asymmetrical designs, and that zipper! I never thought I’d be able to make something that looks this difficult. Spoiler: it’s not difficult at all.

mccall7199-8

I did make things difficult by installing the left zipper incorrectly at first, forgetting that the front was supposed to overlap. I installed it like I would a normal jacket or hoodie, which made it extremely maternity-friendly —  I must have unwittingly wanted it to look like all my other tops. Luckily, unpicking the seam wasn’t a total nightmare, and it was an easy enough fix.

mccall7199-5

There’s quite a bit of piecing involved as well as hand-stitching of the facing (I used the thinnest cotton knit I could find in my stash), so it’s not the fastest project on the block but I’m thoroughly digging the end results. I love all the panels and shaping that happens as a byproduct and the overall effect is sporty yet stylish. And sort of futuristic, no?

mccall7199-7

Trying to figure out how to get the collar to lay in a pleasing way is a fun challenge. And I need to shift the snap position inside because it’s hitting at a weird spot in my armpit. A couple of other nit-picky things: I noticed that because this pattern is meant for knits, there are no instructions for finishing the seam allowances. However, I like to serge the raw edges of my knits, so I did that where it made sense. And my pocket linings keep peeking out, so I’ll need to sew them down and next time, I plan on skipping pockets altogether because it adds bulk to the midsection that I can do without.

mccall7199-3

Other than a few minor, minor issues, this is a top/sweater/jacket thingie that’s going to get a lot of wear! M was very impressed when he saw me zipping it up and declared it “cool”. Now that’s high praise because he rarely notices my clothes — I could be rocking out in a grain sack (which, sadly, many of my dresses resemble), and he would be unperturbed.

mccall7199-10


I’m having a blast sewing for myself and can’t stop! Oh, side note: I was perusing my Pinterest board after I finished making this and noticed that I had pinned an image that obviously propelled me to purchase the pattern without me even realizing it. I’d forgotten all about that pin! The power of the subconscious…


P.S. Furoku members, part 1 is going out tonight!!


Gingers in Indigo and a Shakespearean Valley Top

gingersandvalley1

So my right calf is slightly bigger than my left calf. These are the things you learn when you make your own clothes. I’m on a sewing roll, and I pumped out not only my second pair of Ginger skinnies, but also the Cali Faye Valley Blouse. It was a good week.

Look at me, trying to mix things up with some props:

gingersandvalley2

Yes. A little cornball. You can’t help but imagine muzak accompanying this.

gingersandvalley3

Shall we start with what I’m calling my Shakespearean Valley top? It looks pretty awesome on the hanger, and though the top has grown on me now that I’ve worn it for an entire day and now that the cashier at Jo-Ann’s complimented me on it — she called it my “over-shirt”– I have to admit I feel like I’m billowing all over the place in this blouse. I could probably be airborne if I jumped off of a roof.

gingersandvalley4

I saw the top featured on the Sewing Rabbit via Pinterest, and loved the way it looked so I immediately purchased the pattern. It’s pretty easy to construct, but I noticed that it was labeled “intermediate”. Had I read that first, I probably wouldn’t have attempted the top because I wanted a quick and easy project of the flow-y variety. I’m guessing it’s the fabric recommendation of very light wovens that makes this garment slightly trickier to sew up since I’d made similar types of tunics that were considered beginner-friendly. I used a double-gauze (I can’t remember from where, sorry), which made it even fiddlier. I like the keyhole feature, and I opted to go the non-functional button route. I lined it with a cream voile, and this is what the inside looks like:

gingersandvalley14

gingersandvalley5

The sleeves are what make this top especially Shakespearean, or of that era if you know what I mean. If I’d sewn it in white linen, I would be spouting sonnets. Such full, gathered sleeves! And more gathers at the front and back yokes…all of this makes for a very cute design, but I think the issue is that I should have gone down one size. According to the sizing chart, I should have been an XL, but when I looked at the pattern pieces, I was certain a large would fit me. Sizing is always such a conundrum. At least too big is better than too small!

gingersandvalley6 gingersandvalley7

As for my indigo Gingers — I’m a proud, proud jeans-making mama. I made these out of Selvage denim, which wasn’t quite as stretchy as the black denim I used for my first pair, but with a little tweak here and there (letting out the seam 1/4 inch along the sides and 1/2 inch around my calves), the fit of these indigos are almost better than the black ones. I also made these a smidgen longer.

gingersandvalley8Excuse my exposed belly there and hey, you can see a little of the zipper. Also, I know it’s pure vanity that makes me even mention this, but the fly guard is sticking out in the middle image, making me look like I’ve got a bit of a pouchy stomach. Not that it matters since my Valley blouse leaves everyone wondering when I’m popping out the triplets (what else is new, right? I say this about virtually all my tops). It was significantly easier and faster to sew my second pair of jeans, though I ran into a major problemo:

gingersandvalley11

Ugh. That there is a hole inelegantly patched near the crotch. The lesson here is not to multi-task when serging the fly seam allowance. K was chattering about this cool restaurant she went to with a friend where robots serve sushi, and my hand slipped in astonishment. “Are you okay, Mama? Are you going to cry?” K asked me when she saw my expression as I put my eye to the hole.

Luckily, it is just where no one can/should see unless the person happens to be pervy. Moving along, I used this beautiful striped cotton for the pocket lining. Ditto for the black Gingers.

gingersandvalley9

The only other issue I ran into was my inability to hammer in the rivets to the back pockets. In a display of foresight I’m not usually known for, I had purchased several Thread Theory jeans notions packets. After destroying 12 rivets, I conceded defeat. I’m all out of rivets now, so I’ll have to order some more. I tried to steam close the pocket corner holes, but no go.

gingersandvalley10

I tried this outfit with different shoes, and I can’t decide which I like best. That’s the great thing about skinny jeans – so so versatile. I love that I can slip on boots without all the bunching that happens with my bootcut jeans.

gingersandvalley12

It’s official: my sewing energy is back!
gingersandvalley13P.S. The winner of the giveaway is Jeannie, congrats!

Ginger Jeans of My Own

ginger-blackdenim11

“What are you doing?” he asked me. It was the pounding that caused him to poke his head into the room — he looked confused and slightly alarmed.

I stood there with the hammer poised a few inches above an overturned cast iron skillet.

“Making jeans,” I replied. And whacked a rivet into place.

I made jeans.

JEANS.

!!!!!

ginger-blackdenim6

These Gingers Skinny Jeans took me just shy of a year to complete from the initial muslin, mostly because I was stymied by the idea of altering the pattern. But before I go into the various modifications I did indeed need to make, I want to address this image above.

As you can see, I used indigo thread for what is obviously not blue denim. Until I saw this photo, I actually thought the fabric was blue. I was going for a subtle look, deliberately choosing to skip contrasting topstitching. So much for that plan. It had been a while since I’d purchased the fabric, so I’d forgotten that I purchased black denim. I’m going to have to do something about the lighting situation in my house. Or maybe my eyes need to be checked.

ginger-blackdenim5

At any rate, I’m incredibly proud of my new jeans made out of Osaka denim from here (the link is to the indigo denim, which they were out of when I was at the store. The black denim was slightly cheaper at $15/yd).

ginger-blackdenim1I started out with a size 12 for view B, and ultimately ended up cutting a size 6, predominantly because the Osaka denim is nice and stretchy. However, my calves are solidly a size 8 so I graded up for the lower leg portion. Look at those buxom and sturdy babies. Other changes I made:

– Reduced leg length by 3 inches.

– Tapered the leg opening by about 1 1/4 inches

– Moved the pockets up to the size 12 markings (I think this means my rear end sits high? Or maybe having a non-existent butt means the pockets need to be moved higher. Dunno).

Most of the fiddling had to do with trying to figure out which size worked best for me. I’m embarrassed to admit that I printed out and taped together the pattern pieces from scratch 4 times instead of just modifying what I had already printed up. What can I say, sometimes you just need to start fresh. In my case, it takes a lot of fresh starts. I’ve killed a small tree, I know.

I also killed another tree by printing out the über helpful ebook Sewing Your Own Jeans that Heather created. It was well worth using up my ink cartridges for the 90+ pages because I doubt I would have been able to sew the jeans without this handy guide. With clear (and always witty) step-by-step instructions and plentiful photos, this visual learner was thrumming with happiness. I was also blown away by the alteration tips and tricks — that Heather, she knows what she’s doing.

I wasn’t sure how I’d feel about high rise jeans, concerned that I might be spiraling into mom pants territory, but they are so crazy comfortable that I don’t even care if the hipster youth of Seattle are sniggering behind my back.

ginger-blackdenim10

The best part was that once I figured out the sizing and read this AMAZING post by the genius behind the Ginger Jeans herself, it really wasn’t difficult to sew at all. Sure, I made mistakes and the pockets don’t want to stay entirely flat and there are some extra pooling at the ankles as well as generous whiskering around the knees and at the back of my thighs that might indicate I need to make a few more tweaks, but you know what? They look profesh. Truly. And I love love love love them.

They even look good rolled up like I usually do with all my jeans:

ginger-blackdenim7


Very Pacific Northwest, right?

ginger-blackdenim4

The verdict? Jeans are fun to make! In fact, I had such a great time that I immediately cut out a second pair. I’m about half-way done, and I’ll show you next week!

P.S. The winner of the giveaway is Mary Ann. Cograts!

P.P.S. Secret Valentines! Emails have gone out with partner information. We ran into a minor snafu when we found a couple of dupes after we’d sent out some emails, but they should all be sorted out now. Please let us know if you have any questions at secret.valentine.exchange@gmail.com.

P.P.P.S. Happy MLK Jr. Day to my fellow US residents!


Giveaway: Stylish Party Dresses [CLOSED]

stylish-party-dresses1

Yet another giveaway! Tuttle Publishing has put forth a fun book — all about party dresses! In case you were wondering, I didn’t translate this one. And because it’s not going to be available until September 15th, today’s post is a bit of a sneak peek.

There are 26 patterns (a – z) with that simple, flow-y and Japanese look and feel. The title is a little misleading since there are a number of separates too. That just adds to the versatility, I say. I flipped through the pages and liked these in particular:

stylish-party-dresses2stylish-party-dresses3

And then I thought, why not sew one? 

I selected pattern V because the raglan construction looked super easy:

stylish-party-dresses4

I was talking to one of my favorite baristas yesterday, and as I rustled about my bag in search of dollar bills for my soy latte, he told me how he’s been invited to 13 weddings so far this year. 13!!! Even if I added up all the weddings I’ve been to including my own, I would come up short. The barista is very charming and witty, so I can see why he’d be inundated with invites. Feeling quite inadequate about my barren social calendar, I decided that I should make a casual dress out of knit instead. I found this slinky and soft jersey knit in navy and black lounging in one of my fabric bins and the die was cast.

stylish-party-dresses6

I don’t know…the only fiesta vibe that this dress is evoking is “pajama party”. As you can imagine, it’s mighty comfy. In fact, when K saw me in my freshly made attire, she squealed, “Mama! I love that — it’s so pretty! I want one just like it to wear to bed!” The fabric is from here, I’m assuming, though I’m destined to feature fabric they’re out of. I didn’t have quite enough for the sleeves so I shaved off 3 inches from the sleeve length.

Maybe if I belt it?

stylish-party-dresses7

Or no?

stylish-party-dresses5

Not sure…

stylish-party-dresses8

Either way, the keyhole detail in the back is nice, and I even added knit interfacing (like this) which is a step I usually skip.

stylish-party-dresses11

A word of caution: I found some mistakes with the instructions. For example, the facing is supposed to be sewn on right side together, but the instructions are reversed. Also, I thought this was a funny misprint:

stylish-party-dresses10

There’s a missing line — can you see it?

These are minor issues though, and the garments included are quite lovely. Would you like to win a copy?

To enter the giveaway, any comment will do but perhaps you’d like to regale me with a tale of a recent bash you’ve attended (I like to live vicariously). Or maybe share a favorite party song. Or you could vote on belted vs. non-belted for the pajama party dress. Anything, really. I’ll leave the giveaway open until next Thursday, September 3rd and will announce the winner the next day. International entries welcome! Good luck!!

stylish-party-dresses9


The Great Pattern Hack

Bloghop_TimelineImage-01

It’s my turn to chatter on about the lovely collaboration with Melissa of A Happy Stitch and Michael Miller Fabrics (via Kait of Making it Fun): The Great Pattern Hack! My pattern hacking skills are still pretty basic, so I didn’t get all fancy or wild on you, but I had lots and lots of fun modifying the Southport Dress into two garments.

First up, the strappy-backed tank:

great-pattern-hack1

I selected the Indigo Midnight Cotton Couture, which has a drapey hand and feels like an ever so slightly weightier lawn with subtle sheen. It’s beautiful, and of course, I have a weakness for anything indigo. To remain true to my leanings, I opted to go as simple as possible by converting the bodice to a long tank, and attempted to add wow factor with thin straps that ended up forming the letter M (for Melissa and Michael Miller — not really, that part was totally accidental, but now I’m liking the connection).

greatpatternhack7 greatpatternhack8

I added 11 inches to the bodice, and eyeballed a curvy shape for the shoulders. I’m always very picky about making clothes that are bra-friendly, so I made sure that the back would sit high enough to cover any unsightly undergarments (I wore a strapless).

greatpatternhack4

I cut four 1″ x 20″ pieces that I then folded and sewed into thin 1/4″ straps. First, I attached two straps each on the front side and proceeded to do a lot of body contortions to figure out how much to shorten and where to place the straps on the back. Alas, they’re slightly off, but I doubt anyone will notice.

greatpatternhack5

I could have sewn this up in a jiffy, but I wanted to give it a nominally more “refined” look to it, so I hand-stitched the bias tape along the top edge of the front piece. The back is simply double-folded with elastic threaded through. Easy-peasy.

greatpatternhack3

Conclusion: I love it!!

greatpatternhack6

I suppose I could have stopped there, but I had also requested the fun Indigo Bias Weave, and I just couldn’t get rompers out of my mind. Rompers! I am quite possibly too old to be sashaying about town in a playsuit, but I wore it all day yesterday and not an eyebrow was lifted (or at least none that I noticed).

greatpatternhack9

M, however, did say that I look like a “70s housewife” in a way that implied that 70s housewives aren’t too hot. We’ll ignore him because we all know that 70s housewives were totally smokin’ (in the literal and metaphorical sense).

greatpatternhack10

The only real change I made was to switch out the skirt portion with a pair of slapdash shorts. I’m going to call this “intuitive” sewing since not a lot of measuring actually happened to create the shorts. I marked the width of the skirt waist directly onto the fabric, then grabbed a pair of decent-fitting shorts, and outlined them rather loosely.

greatpatternhack12

I had more than enough of the fabric and was pretty confident that the sizing would be okay, but once I basted them together, I could tell that the rise of the shorts was woefully inadequate despite adding a few inches. Back to the drawing board, and I added an additional 5″(!) to the rise to accommodate my super long torso.

greatpatternhack11

Not sure what’s happening here…I think the outfit inspired me to unconsciously strike a heads-shoulders-knees-n-toes pose. At any rate, the True Bias pattern instructions are great, and the top segment came together effortlessly. I had to tug and pull a bit, but the shorts worked, and overall, the fit is spot-on!

I adore it. I thought I would feel silly in rompers, but it’s really comfortable and the fabric is just the right weight and drape for this pattern. The drawstring detail is a necessary element to avoid the dreaded beer barrel look, and because the cinching happens a little higher than my natural waist, it gives the illusion of longer legs — an illusion that has rarely happened in my lifetime.

great-pattern-hack2

What do you think? 70s homemaker or sweet summer garb appropos for 2015? I think rompers are all the rage right now, right? At least that seems to be the case with the blog hop (I hadn’t looked at any of the other Great Pattern Hack posts until I finished sewing and was pleasantly surprised to see other rompers). In fact, you should go see all the pattern hacks pronto:

Monday 6/29- Kick-off with Jessica Abbott: Me Sew Crazy

Tuesday 6/30- Kait Witte: Making it Fun

Wednesday 7/1- Delia Randall: Delia Creates

Thursday 7/2- Jane Kohlenstein: Buzz Mills

Friday 7/3- Melissa Quaal: A Happy Stitch

Monday 7/6- Rachael Gander: Imagine Gnats

Tuesday 7/7- Tamara Serrao: Kaya Joy

Thursday 7/9- Laura Titchener: Craftstorming

Friday 7/10- Kristin Timm: Skirt as Top

Saturday 7/11- Jessica & Ericka: Violette Field Threads

Monday 7/13- Celina Bailey: Petit a Petit and Family

Wednesday 7/15– Erin Sundet: Sewbon

Thursday 7/16– wrap up! More giveaways!

Finally, I should point out that I did receive the fabrics and pattern for free as well as some compensation for creating the garments and writing about them — this is the first time I’ll be receiving actual payment for a blog post so I guess this counts as a sponsored post (I’m embarrassed to say that it hadn’t even occurred to me to call this a sponsored post – I was delighted to team up with Melissa and would have done it for gratis)! Needless to say, but I think I’m supposed to say it: all opinions are my own.

At any rate, I’m pleased with both hacks and really enjoyed sewing for myself again. It sounds like some amazing giveaways are happening and much fanfare abounds. Don’t miss out, and thank you so much for including me, Melissa and Kait!