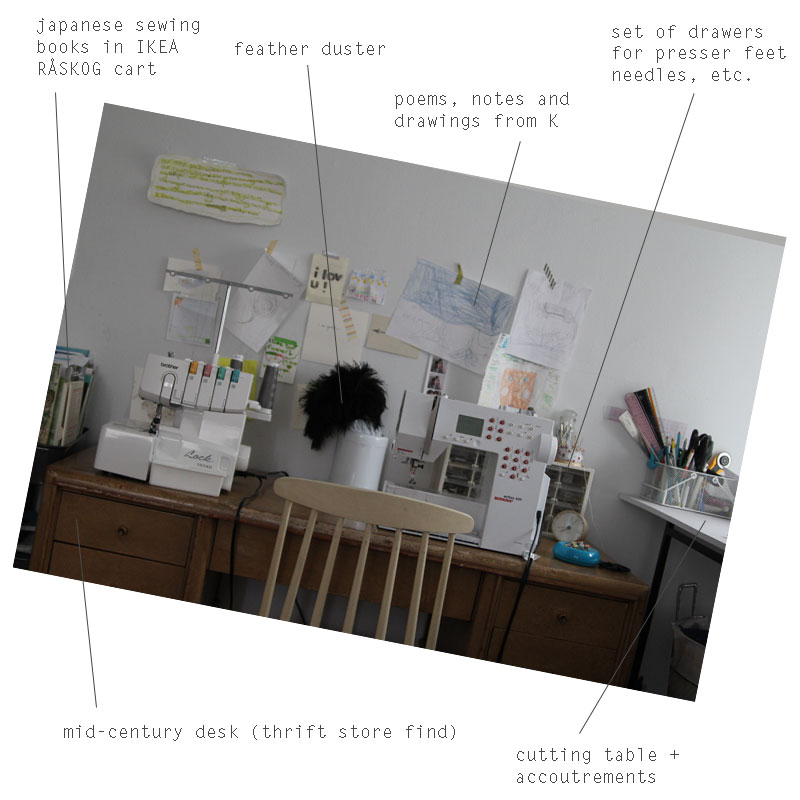
My Little Sewing Space Part 2

sewing-space-pt2-2

Good morning! I did sew something for K: an absolutely dull blue and not particularly attractive Seahawks tee-shirt at my daughter’s request, because she — much to my shock — is a football fan. Who knew parents completely oblivious to the Superbowl would produce a gung-ho 12th man? 12th man is the term used for a Seahawks fan, as I understand it, but don’t hold me to it.

But why subject you, my discerning friends, to a stenciled tee yet again? Instead, I thought it might be a little more interesting to continue showing you my sewing space. I love seeing how other people have their work areas set up and maybe you would have suggestions for improving mine – that would be much appreciated! I ended up with more photos than I expected, so there’s going to be a part 3 on Wednesday.

Shall we continue with the desk? I picked up the little organizer with drawers from Storables years ago and it works really well to keep all of my odds and ends stored yet accessible (I can’t find the 20-drawer version online, but it’s similar to this).

sewing-area-pt2-1

On top of the little organizer, I keep my weights I get from the hardware store for tracing patterns. They’re in a wooden bowl a dear Kiwi friend gave me as a gift. I’ve had that bowl for over fifteen years and it makes me happy to have this memorabilia from her (she lives in Australia now and it’s been many years since we’ve had a proper face-to-face chat). The glass jar holds vintage safety pins from my mom, and the pincushion for hand-sewing needles and extra pins is from Daiso, our local Japanese dollar store. The jumbo darning needle (the gold one) is handy for poking out corners or threading elastic. The pretty glass coaster is from Anthropologie and I love the colors and sparkle. And of course, I can’t live without my seam ripper nearby.

The tiny little drawers are ideal for my assorted tools. The first row is exclusively for the machine needles I use the most (except the twin needles – those I dislike and avoid using). You can see that I separate my needles by type.

sewing-area-pt2-3

The second row has extra hand-sewing needles, less frequently used machine needles, and extra pins.

sewing-area-pt2-4

The third row is a mish mash – I store my presser feet in the first drawer and info about the various presser feet next to it. I have some chalk powder, a tape measure and a brooch from M’s grandmother (no idea why it’s in there) and snaps. I could organize this better…

sewing-area-pt2-5

The fourth row has threaders, bodkins, the little brush for cleaning out the sewing machine dust, oil, point turner and seam presser (never used it), chalk, and tape for assembling PDF patterns. That last drawer contains plastic labels for the drawers, which I obviously haven’t bothered to use.

sewing-area-pt2-6

Moving along to the desk drawers, I already showed you the one that contains the my fave thread colors. The drawer above it houses the bobbins and my walking foot and a Bernina pouch that came with the sewing machine. The pouch contains some mysterious tools that came with the sewing machine — I have yet to figure them out. This is also where I keep the instruction manual for my sewing machine. I use the tweezers to thread my serger and like to have it accessible.

sewing-area-pt2-7

The center shallow drawer is still in progress and has all of my other thread spools.

sewing-area-pt2-8

And then on the right, the top drawer is a bevy of tools I couldn’t fit into the desktop organizer and don’t want to have out in the open necessarily. More pin cushions, needles, tape measures, tape, dusters, wonder clips. It used to look a little neater when I first cleaned it out.

sewing-area-pt2-9

The final drawer is where all of my favorite elastics congregate. I often use the 1/8″, 3/8″, 1/2″ and occasionally the 5/8″ and 1″. I also toss in double-sided fusible tapes, knit tapes, Steam-A-Seam and piping in here.

sewing-area-pt2-10

On the left side of my sewing table, I keep all of my Japanese sewing books and a selection of other, non-Japanese sewing books, along with my reference binder for commercial patterns. To take this photo, I had to pull it out into the hallway since I didn’t have enough room to frame its entirety.

sewing-area-pt2-11 sewing-area-pt2-13

Now that I’m looking at these images, I’m itching to organize everything better. This was a good exercise! Stay tuned for part three: the cutting table + ironing station!


My Little Sewing Space

sewing-space1

This might be the longest I’ve gone without sewing anything for myself since I started to make my own clothes. I miss it, but I’m time poor at the moment, and when given the chance, I tend to choose sewing for K or tidying for the sake of mental sanity. In a little while, however, I’ll be able to get back to some grown-up sewing…I’ve got my denim washed, pattern pieces cut out, jeans hardware at the ready and if I don’t get started on these skinny jeans soon, there’s a risk that it’ll never happen. (and yes, I’m working on my secret valentine project too!)

I organized my sewing table. Have I told you that I sew in my bedroom? I know it’s sacrilege to have a workspace where you sleep, yada yada yada, but I moved my so-called “atelier” when K was in kindergarten three years ago because she would get scared at night and pad two floors down all the way to the basement where I would be toiling at my Bernina into the wee hours. Our bedrooms are next to each other, and I figured that if she could hear the hum of the machines, she would know that I’m close by and feel assured. So far it’s been working.

Plus, if a sewing table in the corner of a bedroom is good enough for Flossie Teacakes, it’s good enough for me. Mark Bittman cooks in a pint-sized kitchen (I half-heartedly tried to see if he’s upgraded since 2008 but I didn’t find anything), and though he doesn’t love it just as I don’t totally love my ad hoc craft station, it gets the job done and sometimes, magic happens. Of course, I drool over capacious and stylish studios on Pinterest, and though I sigh at the dreaminess of it all, I’m quite content with the functionality of the current set-up. I have humongous thoughts on the benefits of limitations, but that’ll have to wait for another day.

One of the things I did was to go through my drawers and trash all the junk. Now I am delighted every time I open my drawer of commonly used threads (I don’t like to keep them out because they get so dusty):

sewingspace3 sewingspace2

This is sort of a part one since the winter light in the Pacific Northwest makes photography a race against time and it was getting too dark for decent shots. I’ll show you more close-ups of how I arrange all my stuff because I get geeky about organization and love to see how other people keep their materials corralled. More soon!


Let’s Talk About Fit

fit-books

So I’ve been sewing for a while. A quick glance through the archives will tell you that my style has been predominantly muu muu meets prenatal wear when sewing for myself: comfortable, easy, fairly shapeless, ideal for all-you-can-eat-buffets. I absolutely love my potato sacks, and one of the things I’ve discovered about myself through sewing is that I am not the perfectionist that I thought I was. Thread not matching exactly? Eh. Pocket placement out of alignment? Whatever. Skirt waist doesn’t fit all that well? That’s what belts are for!

But over the years I’ve been quietly collecting books and resources for understanding fit — it’s something that feels daunting and complicated for my spatially challenged mind that barely passed geometry and trig. I’m not planning on whipping up a corset anytime soon (or ever), but my recent toe-dipping into drafting my own patterns made me want to truly understand how to alter patterns to better mold to my body. I’m not looking to create body-skimming outfits; rather, I want to have the know-how to deal with the weird gape that happens between my shoulder and armpit, to once and for all get a handle on doing a proper FBA, etc.

My collection of books on fit is far from complete, and I’m always on the lookout for good ones. The internet is a treasure trove, of course, and I’ve heard that there are some good classes offered through Craftsy and Creative Bug. I have a lot of resources at my fingertips, but I still haven’t plunged into the learning part of the equation, and I think it’s high time.

Below, I’ve listed the resources that I know of by books and online classes – I’m guessing that there are amazing youtube videos out there too. I’m very much a visual learner and love picture-heavy books and videos. And of course, there’s the actual doing and practicing. That’s probably how I learn best, by diving in and through trial and error. If you have any suggestions for gaining mastery of fit, I’d love to hear them and will add them here to make it my go-to resource page for all things fit-related!

BOOKS

fit-books2

Fit for Real People by Pati Palmer & Marta Alto – The cover is quite unfortunate, but this is touted as a classic and is highly rated.

Dress Making for Real Women by Lorna Knight – The illustrations look very clear and understandable in this one.

Perfectly Fitted by Lynne Garner – I’m quite intimidated by the draping method in this book, but I’m eager to learn more. I like that variations to basic patterns are offered (e.g. different sleeve options to add to a top).

Pattern Cutting Made Easy by Gillian Homan – This book isn’t actually specifically about fit, but more about drafting pattern pieces. You do, however, glean some insights into adjusting the patterns in different ways.

The Pattern Making Primer by Jo Barnsfield and Andrew Richards – Claiming to be the “ultimate resource for pattern making”, this book appeals the most visually to me. The clean, simple illustrations with lots of white space and clothing samples that don’t look too dated, I’m excited to devour this one.

The Complete Photo Guide to Clothing Construction by Christine Haynes – This is more of a basic how-to, but the instructions appear to be excellent and the contributor list is impressive (Sarai of Colette Patterns is one of them). It’s a new book that just came out.

Design-It-Yourself Clothes: Patternmaking Simplified by Cal Patch – (Not shown) This is a good introduction to pattern drafting, and I used it for the first time last week. I love it!

The Complete Photo Guide to Perfect Fitting by Sarah Veblen – (Not shown) I don’t own this book (yet) but it looks right up my alley with lots of visual instructions!

How to Make Clothes that Fit and Flatter – (Not shown) This was recommended on Coletterie, and might have to become part of my library too!

Pattern Fitting with Confidence by Nancy Zimmerman  – (Not shown) This one looks promising too!


fit-online-classes

ONLINE CLASSES

Craftsy – This is the general link to fitting classes, and listed below are the ones I’m interested in. The classes are on the pricey side ($40 – $50 per class), but you can do a free trial for a limited time.

Sew the Perfect Fit

Custom Fitting: Back, Neck and Shoulders

Fast Track Fitting

Sewing Knits that Fit

Sewing Designer Jeans

Custom Fitting: Waist and Hips


Creative Bug – The offerings are less for sewing on Creative Bug it seems, but the inimitable Liesl has a couple of courses that look good. They have a subscription-based model and also offer an a la carte option. Some free classes too!
Dart Manipulation with Liesl Gibson
Bust Adjustment with Liesl Gibson

Skillshare – There are a couple of garment fitting classes offered through Skillshare at this time and both are taught by former Project Runway contestants. Like the others, a free trial membership lures you in, and the subscription is about $10/month.

Garment Construction: Introduction to Draping with Anya Ayoung Chee

Make Your Own Clothing: Introduction to Garment Construction by Joshua McKinley


Let me know if you know of other (preferably free) excellent resources!


My Fave Sewing Tools

fave-sewing-toolsSo, not a lot of sewing is happening this week, though that’s going to be changing as soon as I turn in my sketches by Saturday. In the meantime, I rounded up some of my favorite sewing tools, just because.

When I first started sewing about six years ago, I didn’t really know what supplies to gather beyond a sewing machine, iron, ironing board, pins and shears. I had fabric too, of course, but the whole world of notions was a mystery. Because I didn’t know what to get, I got everything. I saw people with measuring tapes looped around their neck so I bought one. Turns out, I never use my measuring tape. Same with the French curve, the esoteric sewing apparatuses — I don’t even know what some of them do or are called!

Over the years, I’ve developed strong preferences for my sewing tools. What you see above have been game-changers for me.

Bodkin – This is one of my absolute faves. I love this tweezer-looking tool for threading elastic into waistbands. Even with 1/8-inch elastic, the teeth at the ends grip firmly, and it’s the perfect length and width to go through narrow kids’-sized casings. Sure, you could use a safety pin, but this is a whole lot more fun to use. I do sometimes use a safety pin at the other end of the elastic so I don’t lose the elastic — hate it when that happens.

Wonder Clips – I believe these are meant for quilting but I love using them for sewing knits and especially for holding zippers in place.

Magnetic Pin holder – This is a rather new addition to my sewing toolkit and it’s changed my life. I LOVE pincushions, but I didn’t realize how much time I was spending carefully inserting the pins back into the cushion. Now I practically fling my pins in the general direction of the magnetic holder and voila, accessible and neatly contained.

Flower-Head Pins – I like the regular ones, too, but these fine pins are my go-to pins. They’re great for every type of fabric and though you do have to be a little careful because they’re delicate and could easily get bent out of shape, combined with the magnetic pin holder, they make a fierce  workhorse duo.

Washers as weights – I guess there are fancy weights for sewing? I went to the hardware store and grabbed a few of the big washers in several sizes and they’re perfect. I usually use one per corner and maybe one in the middle depending on the pattern piece and they’ve served me well. I’ve lost quite a few though (I suspect K had a hand in this), so I’ll need to replenish soon…

Seam gauge – While creating this post, I discovered this seam gauge that I now want, but so far this Dritz one has been great. I use it all the time and have two. One is by my iron at all times and the other lives near the sewing machine.

Chaco liner – I prefer the pen style, but I also like the lipstick style too. For some reason, the lipstick style seems to work better on knits for me. The click-click-click as I trace is a great rhythmic comfort, and I love how easy it is to draw straight lines with these. I’ve tried pretty much every kind of tailor’s chalk out on the market, and these are the best by far.

As you can see, I’m very partial to the Clover brand (note: I’m not at all affiliated with any of these brands). Their products are so well-made and have stood the test of time. Oh, I forgot to get a photo, but the biggest game changer of all has been the Swedish Tracing Paper. I don’t have to extoll its virtues since people have been raving about it in the sewing blogosphere forever, but it’s really made tracing all my Japanese patterns so much more pleasant. Dare I say, almost fun? The paper is sturdy, malleable, sewable, writable, everything-able! Love love love it.

So there you have it, my fave tools. What about you? What’s in your toolkit of indispensable sewing supplies?

fave-sewing-tools2

Seam Allowance Curve Ruler

As I down coffee after coffee and scurry about with watercolor pans and digital painting tools in the background, I deigned it high time I finally cross off an item from my “must-write posts list” (lists breed like bunnies in my notebooks).

One of the distinctions of Japanese patterns is that seam allowances need to be added. I know that this is often a turn-off for many folks, but I happen to love it. There’s something about adding that extra 1 to 3 centimeters to the traced pattern pieces that I find very soothing. I’m probably weird, though.

sa-curve-ruler2

So a few months ago, the always knowledgeable June pointed me in the direction of the SA Curve Ruler. Before I had a chance to check out the link, however, the owner of the company contacted me to see if I would like to test them out. I said yes, of course, because c’mon — a ruler that would make adding seam allowances a piece of cake? No brainer.

I received the 3/8 inch mini and pattern drafter (3/8 inch = 1 cm, and most Japanese pattern seam allowances are 1 cm). I think the concept is genius and I really wanted to fall in love with them. In all frankness, they haven’t revolutionized my life, but I like them a whole lot. I’ve been using them for some weeks now, and there are many obvious benefits. The idea is that you can slide the the ruler along the pattern edges for a quickie seam allowance addition, rather than the connect-the-dot system I usually use. With both the mini and pattern drafter, you’re pretty much covered for all curves and straight lines.

sa-curve-ruler1

The main problem for me, though, is that I have chubby fingers. The 3/8 inch ruler is…well, only 3/8 inch wide, and I found it challenging to hold the rulers down properly. My fingers keep getting in the way. Also, it was a little cumbersome to have to switch between rulers and there wasn’t an easy way to create certain seam allowances larger than 1cm (1.5cm, say) since I didn’t have the metric version. An easily solvable situation. I do find it very helpful for straight sides and use them often for that. And I see a lot of potential for pattern drafting. The curves are still a little tricky for me, but like with anything, with practice it becomes easier to use. I like the design, the way the rulers are clear, and the concept itself is fantastic. I bet the 5/8 inch would be perfect for Burda patterns.

sa-curve-ruler3

I did let Claire, the owner, know that it would take me a while to post about the rulers, but now I’m very sad that I took this long to talk about them. She seems to have decided to shut down her company, though she is still selling her rulers through a few venues. I did promise to review them, so I wanted very much to honor that. I really do think the rulers are great products with multiple uses. I am so appreciative of and impressed with women taking risks and forging ahead with businesses. I hope another venture is in the works since she’s very ingenious and talented!