2018 Advent Calendar + Free Holiday Tags

Hello, my friends! I’m testing out different blog posting schedules to see what feels right and so far, once or twice a month seems the best fit. I’m all about not overdoing anything nowadays, and methinks it’s the ticket to not getting sick. Both K and M came down with the sniffles in the last few weeks and I’ve been impervious to the germs (knocking furiously on wood as I type this).

Let’s talk about this year’s advent calendar shall we? I’m quite proud of this one.

About five years ago, I spotted a DIY project for paper houses on Pinterest and desperately wanted to make a winter village as an advent calendar. However. To start with, the time commitment was obvious — that’s a lot of cutting and folding and gluing. I don’t have one of those handy dandy Silhouette or Cricut machines and had no interest in owning one. Since I tend to procrastinate, I would come up with a different idea at the last minute every year.

For whatever reason, this year I was on top of things. Not only did I plan out the project three weeks in advance, but I even designed the houses myself. I know. Crazy. I was going to download a bunch of free online templates but when I saw how basic the shapes were, I figured it would be easy for me to customize my own. I spent an afternoon designing and voila, I had 8 templates.

I spent maybe an hour or two a day working on the calendar for a couple of weeks. I printed the houses on my usual inkjet textured paper, of which I seem to have an endless supply. I printed three of each template for a total of 24 houses. Then I sliced out the windows and doors with an Exacto knife but used regular scissors to cut out the houses. For scoring the sections that would be folded, I used a Japanese hera, which is actually a marking tool for sewing. I don’t like to get messy, so I got these mini glue dots, which were perfect.

Now, I typically design the advent calendars in a count-down style. The visual reminder of the number of days left is fun for K, and it makes clean-up a breeze later. But I spent so long on these houses and I love the way they look so much that I wanted the whole village on display for the entire holiday season. After mulling over this situation, I landed on the idea of flameless tea lights that K could place in each house. I considered adding numbers to the houses, but I’m more of a visual minimalist. I’m lovin’ the plain white houses.

Conveniently, there are 24 tea lights in a pack. Since these tea lights only last 3 hours, we decided to light them all on Christmas Eve.

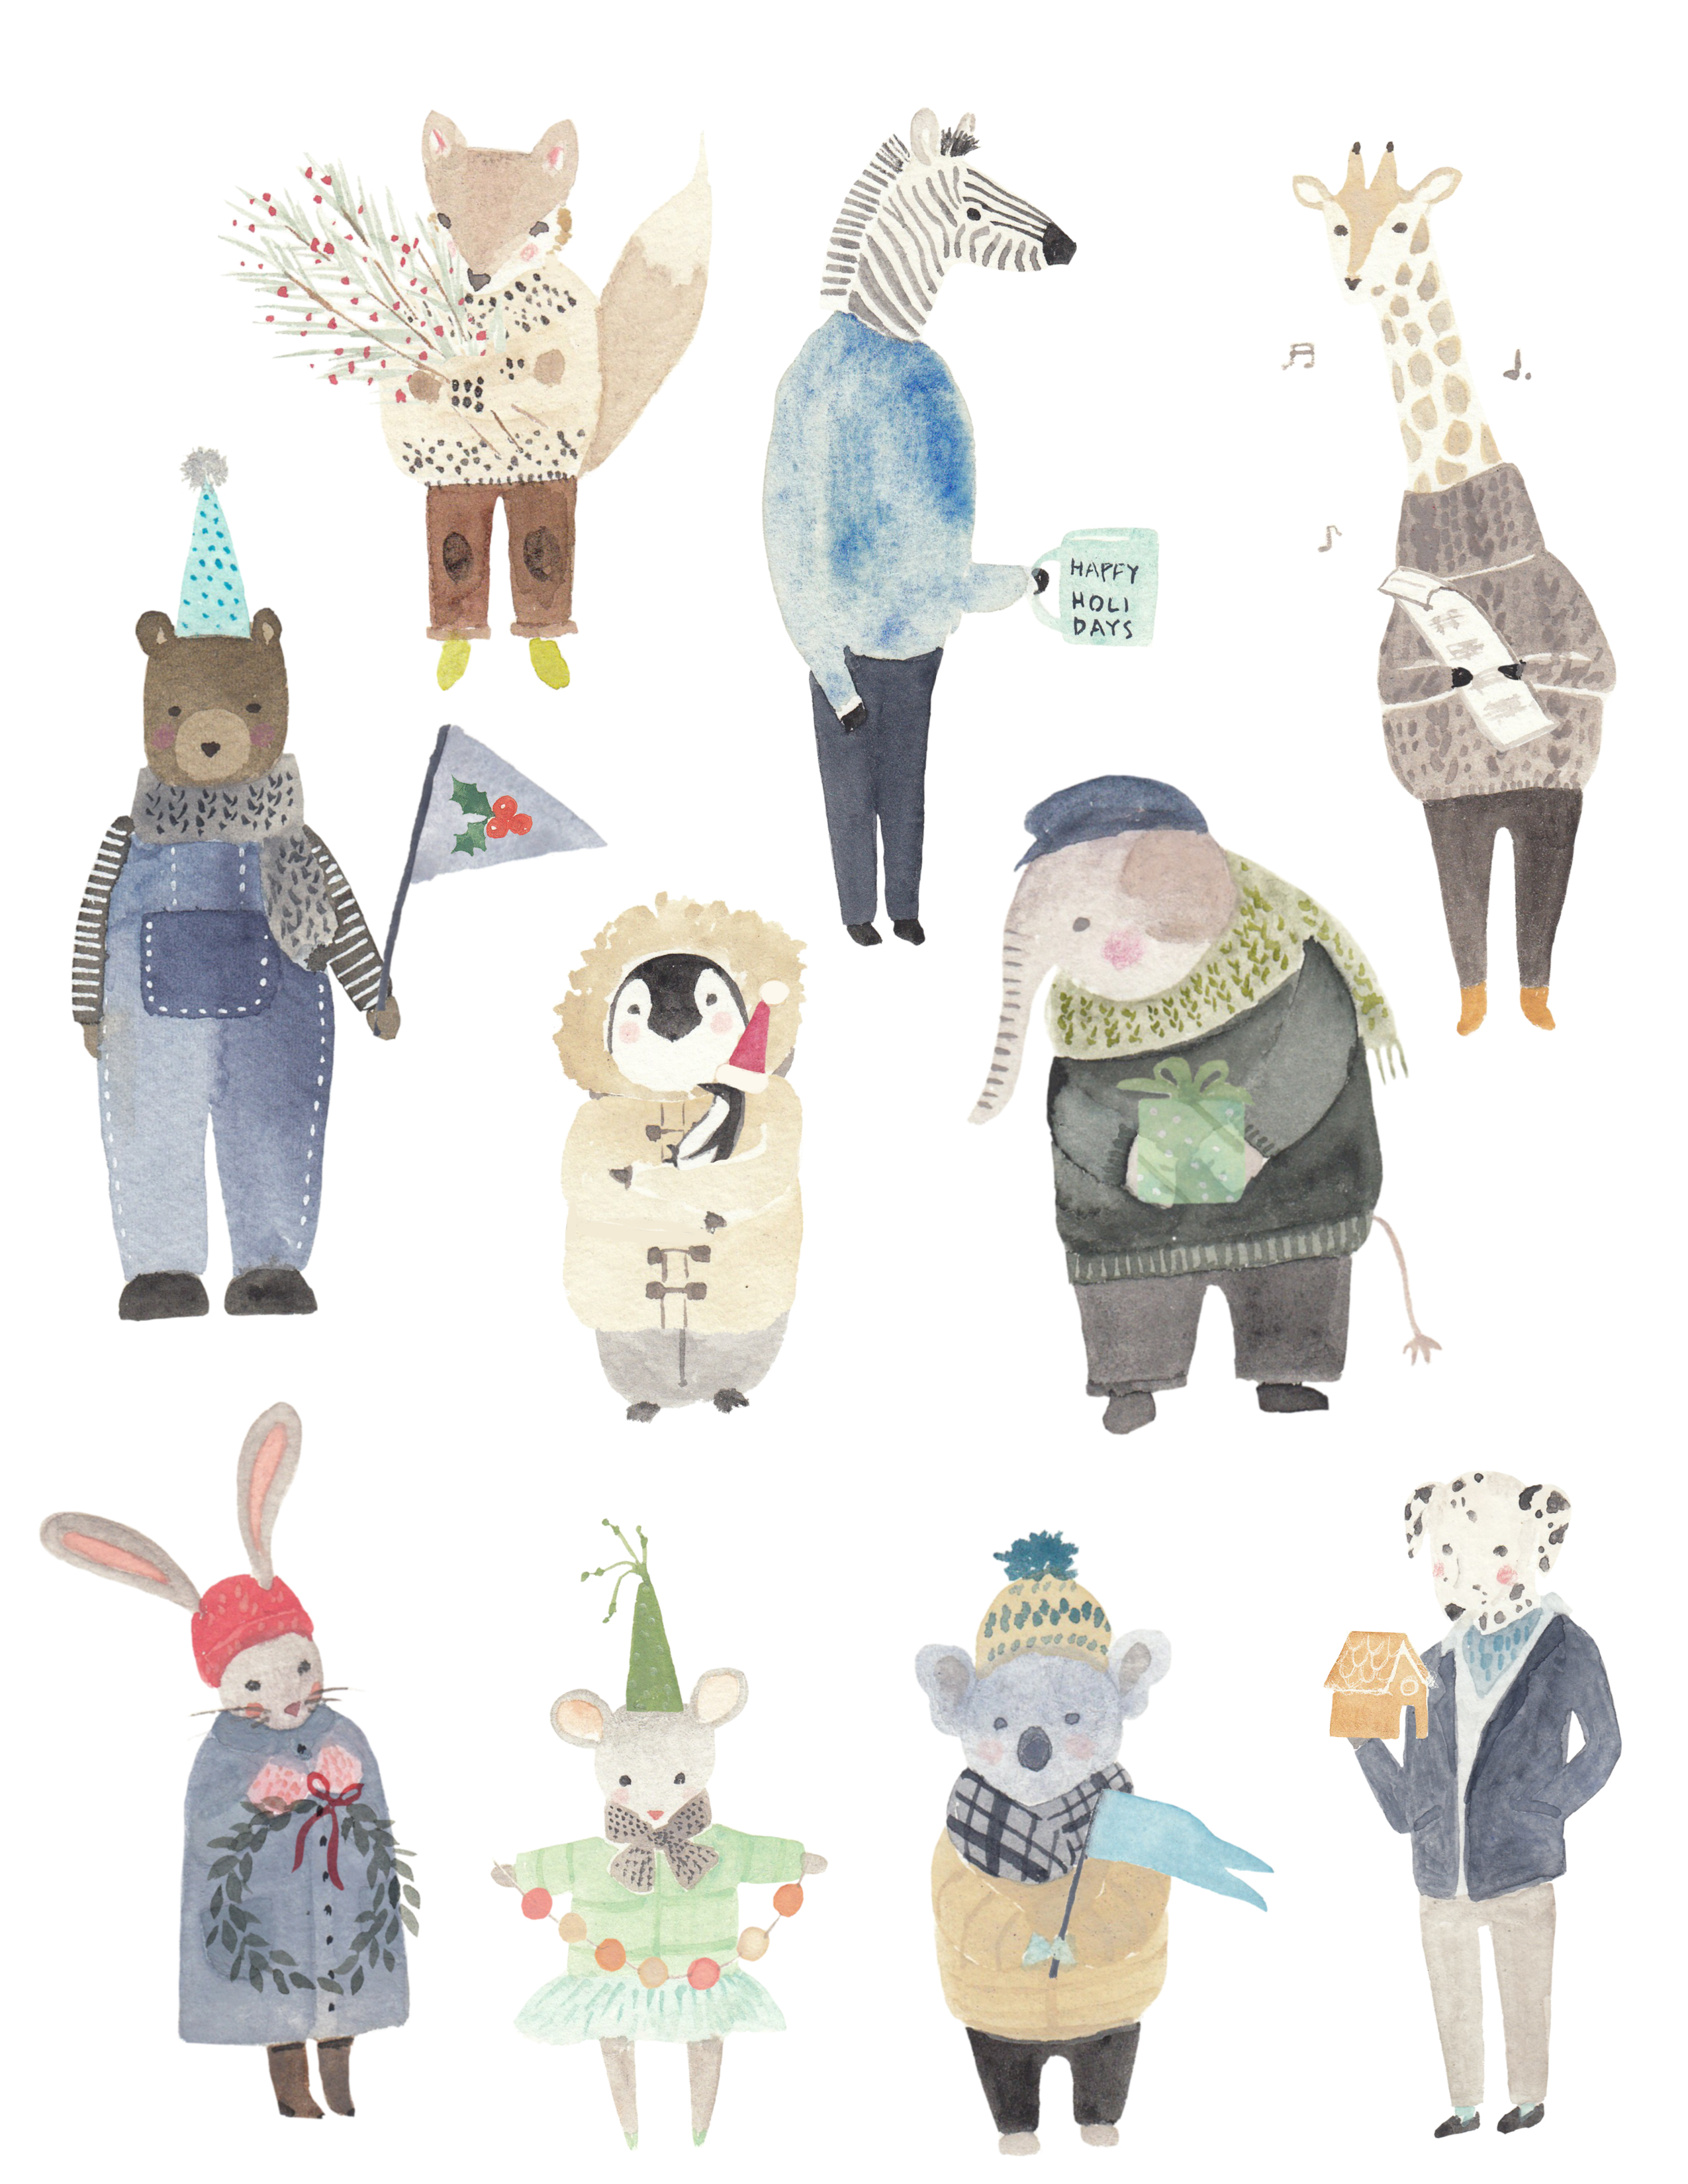
I was making excellent progress, but something was still missing. I wanted a sweet little package that K would be able to open each day and a single tea light left something to be desired, so I painted a bunch of animals. I went to town dressing them up in winter garb and labeling them with numbers, then printed these out on the same inkjet textured paper. Aren’t they cute?

I scrawled the daily activities on the back (every other day, she gets a book so I simply wrote “book” for those days).

I wrapped each tea light with an animal card and placed them in a basket, which served as the count down aspect. On a side note, I found that basket at Trader Joe’s and it’s made out of newspapers. So cool! Oh, and the books are wrapped in this super darling black-and-white paper I found at a local natural foods grocery store.

This advent calendar has been THE BEST. K absolutely adores it and I feel so happy whenever I look at the winter village displayed on top of our old upright piano. At first I put it on our credenza (photo below) but quickly realized that Katara, our cat, will think they’re her toys and scatter them willy nilly.

Can you tell that I had a blast making this calendar? I’m going to display it every year for the holidays, you betcha.

I chose a few of my favorite animals that I painted (I removed the numbers so they’re not advent specific) and made them into a free downloadable for you as a little gift from me. Just print them out on cardstock (or the inkjet textured paper that I use), cut around the shape and make sure to leave a little extra at the top to punch a hole. These make lovely gift tags!

Click on the image to download (you may need to right-click and save onto your desktop to enable printing). Please let me know if you have any issues with the download.

Well, it’s time to wrap this up and tend to other to-dos. I’m almost done with Christmas shopping and making and I have some book stuff to finish. If you’re interested, here are the other Advent Calendars from years past:

2017

2016

2015

2014

2013

2012

I hope to check in again in a couple of weeks or so! For now, I’m signing off with a “Happy Holidays!!!” from my two beloved Ks:

P.S. Katara hated the Santa hat.

Black & White: Linden Loves + Making Magazine no. 6

Happy Friday! I’ve had an unusually social couple of weeks with more events on the horizon, which means I can really feel the tug of my inner introvert imploring me to hibernate and recharge. Getting out and about is good for me, I must say, and last week I made a couple of Grainline Studio Linden tops that happened to match one of the events I attended this past Monday: Making Magazine’s Black & White trunk show at Drygoods Design.

You know, as someone who spends a lot of time alone squirreled away working on projects that don’t see the light of day for months on end, I often forget how scintillating it is to connect with people in real life. Online communication has its place and is a wondrous thing, but nothing beats a face-to-face conversation. I’ve been working with Carrie, Ashley, Cecily, Whitney and Lily of Making for over a year now but this was the first time we met in the flesh (ew, why does that sound so gross?). It’s such an uplifting feeling to discover that someone’s online persona perfectly matches the in-person personality. They are down-to-earth, easy to talk to, brimming with creativity and ideas and are just all-around wonderful. I had such a lovely time with them all! If you haven’t already, I highly encourage you to listen to the first episode of the Making podcast to learn more about Carrie and Ashley. They are so, so inspiring! And I’ve been shy about mentioning it, but I was interviewed a while back as well. You can find that podcast episode here.

Anyway, so caught up was I in blathering away, I forgot to snap photos, but I was excited to see that my little contribution to the Black & White issue was included in the trunk show. I made these guys:

Photo by Carrie Bostick Hoge

They’re felted animal masks! And how stunning is this magazine cover by the awe-inducing Lisa Congdon??

I also had the privilege of meeting Sonya Phillips of 100 Acts of Sewing, who was teaching a class towards the end of the trunk show and that was a major treat too. She’s the real deal, folks. There’s an abundance of joy in her creations. Another all too brief encounter was with Kristin of Woolfolk Yarn. Oh my goodness, have you seen her website and Instagram feed? Pure gorgeousness. Kristin listened to my knitting woes and sagely assured me that I was ready, that I can absolutely knit. She has such a grounded, beautiful presence. My only wish was that I could have stayed longer to chat more with everyone.

The intrepid women of Making and Jen of Grainline Studio often collaborate together so it was doubly fitting that I wore a Linden top to the event. I chose the polka dot one, of course. Other than adding 2 inches to the bodice length, I didn’t make any changes to the pattern for this version. It’s a straight up size 6. I love the Linden so much. So quick, so easy, so versatile! I’ve made a gaggle of them in the past, and I’ve gotten over my former reluctance about sewing the same pattern over and over. There’s something very comforting about a familiar pattern.

For this black wool version, I tried out Jen’s tutorial for a flat bias neckline. However, I had already cut out the neckband as per pattern instructions, not on the bias — which I don’t think should have made too much of a difference for this stretchy wool knit — and for some reason, my neckline got very wavy. I don’t mind the waviness, though I’m sort of confused by this super awkward pose in the photo. What am I doing? I included it to remind myself that I’m ridiculous in so many ways. I made a few other changes to the pattern with this version: shaved off an inch for each sleeve and slimmed the bodice by about an inch as well. And I always add at least 2 inches to the bodice of any top pattern to account for my extra long torso. This wool feels luxurious, and I’m pretty sure I got it from Drygoods but for the life of me, I can’t remember where I got the polka dot sweater knit from. I adore this black top despite the less than perfect neckline (see the wavy bits below?). Nothin’ a good scarf can’t hide. That I will knit one day.

There’s not a lot to be said for the back view, but here it is:

As long as I’m mentioning patterns that I keep sewing repeatedly, I’m wearing my 5th pair of Ginger skinny jeans that I never blogged about. The thing with these jeans is that the denim doesn’t have a lot of stretch so they aren’t my most comfortable pair. They look pretty good though, don’t you think?

And there you have it. Lindens, crafty folks, connections, repetitive sewing.

Okay! I’m doing a school presentation this afternoon and then I’ll be participating in the Ballard Art Walk at Secret Garden Books on Saturday, November 10th, so come on by if you’ve got a few spare moments from 6-8pm. I’ll have some original illustrations from my books on display and will be doing some custom illustrations too!

I’m off to prepare for these two events and then I’ll be back to my solitary schedule for a few weeks. Ahhhhhh…that sounds nice.

I hope you have a delightful weekend in every way, my friends!

Happy Friday + Making LINES

Photo by Carrie Hoge

Happy Friday! Have you seen the latest Making issue, LINES? What a beaut! Carrie and team continue to slam dunk with gorgeous content, and I’m so honored that I was a contributor! Many things have changed in my life these last five years, and one of the most glorious changes is that I now get to collaborate and work with the loveliest, most amazing people all the time. I’m sad to say that wasn’t usually the case for the 25+ jobs I’ve had in the past, though of course there were always a gem or two.

Today I thought I’d do a sort of behind-the-scenes of my projects in LINES, since that’s always fun for me.

Photo by Carrie Hoge

Project one was the nesting fabric buckets. I realize I’m not scoring any points for originality here, though I did add flourish on the canvas fabric with fabric paint, which turned out to not only be enjoyable, but I was also very happy with the results. Quick and easy, that’s how I roll.

Here’s another pretty outtake of the buckets that Carrie shot:

Photo by Carrie Hoge

I can’t remember exactly whether I offered or if Carrie asked me if I wanted to contribute to the kids’ section as well. At any rate, I was planning on creating an animal nesting version and made these samples:

Then I found out that there was a distinct and totally coincidental cat theme going on in the kids’ section so Carrie wondered if I would be able to make a cat version. But of course!

Photo by Carrie Hoge

So cute, right?? As I’m prone to doing, I squealed with delight when I finished the kitty basket.

Plus, it worked out well because the bear and owl buckets ended up as gifts for friends and K fell in love with the bunny.

What you may or may not have noticed if you’ve browsed through the issue is that I did a number of illustrations, which was a dream assignment. I’ve always wanted to have my illustrations in a beautiful print magazine, and I can now check that off my bucket list. Thank you, Carrie!

The middle illustration was based on the supremely adorable cat made by Erika Barratt (her instagram AND Making‘s feed are must-sees — so much inspiration!).

The entire issue is a visual feast full of thoughtful projects and stories. I hope you check it out!

Have a wonderful weekend, everyone!

I’m out of practice
Haven’t created haikus
in a long, long while

P.S. Furoku members! The next edition is scheduled to go out tonight…I think. I hope. Probably!

Happy Friday + Etsy Shop Update!

FoxToothPillow-main
photo by Carrie Hoge of @maddermade

Happy Friday, friends! I added another item to my etsy shop! For about a year or so, I’ve only had one item, and now I have a grand total of two items. At this rate, I might have three items by next year.

This fun little tooth fairy pillow I made for the FAUNA issue of Making Magazine is now available as a downloadable pattern/tutorial for purchase in my shop here. I think it’s pretty darn cute, if I do say so myself.

Speaking of Making Magazine, I’ll have another project in the next issue coming out soon and here’s a little sneaky peek:

makingpincushion
photo by Carrie Hoge of @maddermade

I really enjoyed stitching this up!

Well, it’s spring break as of this evening and my mom is visiting from Los Angeles and there is much mischief and good times to be had. I’ll be back with some sewing next week!

I don’t have to cook
And K is taken care of
Ba-chan* visits rock

*Although “Ba-chan” technically means grandma, M and I now call her Ba-chan too. She loves to feed us and play with K, so it feels like a real vacation for me as well when she visits!

Happy Friday + 2016 Advent Calendar


2016-adventcalendar2Happy Friday! We’re 9 days deep into the Advent Calendar and as always, I went with the handmade option. I was tempted to simply use the faux leather fortune cookie version I made for Sewing Happiness:

winter-adventcalendar-28181 winter-adventcalendar-28214And though they’re super cute and would have made this year’s start of the holidays a snap, for reasons beyond rationality, I felt compelled to create something new. I don’t know, using the already made fortune cookies seemed like cheating somehow. Maybe I’ll be singing a different tune next December.

2016-adventcalendar5

However, “simplicity” is my new life motto, so I wanted to keep the construction process as easy and quick as possible. My solution? Glittery stars. Here’s what I did:

  1. Bought three sheets of glitter wrapping paper from Paper Source (champagne, silver and gold)
  2. Made a star template in Photoshop. You can easily find a template by googling “star template” too.
  3. Using the template, I folded the wrapping paper in half with right sides together, and traced 9 stars per color and cut them out. I figured I would mess up so I might need a couple of extra.
  4. With wrong sides together, I sewed along the edge of the shape, leaving one pointy edge unstitched. Ta-da! A little star pouch.
  5. I filled each star with a numbered strip of paper with an activity printed on it (e.g. donate 2 pairs of shoes, go ice skating, etc.)
  6. I added a little punched circle with the number of the day, hole-punched the unstitched point of the star and secured with baker’s twine that I then hung from the ceiling with masking tape

Okay, when I type it out like that it seems a lot more involved than it actually was. The whole thing took me less than two hours to make, which has not been the case for my other advent calendars to date.

2016-adventcalendar3

They’re so fun! I hung them right above the piano so K can play “under the stars”. The overall effect is very festive and every person who has come over has loved this year’s advent calendar.

2016-adventcalendar7

K won the indulgent parent lottery so she gets something daily. To balance things out, however, she also has to donate a lot every other day. On odd days, she gets a little gift (there’s a heavy unicorn theme going on this year) and the slip of paper in the star includes an activity, such as making ornaments together.

2016-adventcalendar8

On even days, she gets a book and is instructed to donate something specific (stuffed animals, clothes, and such). I have to admit that the donation portion of the calendar isn’t going over too well, but I’m persevering and standing my ground. Instead of the scavenger hunt element, I mixed up the stars so she needs to look for the right day. It was tricky keeping up with the scavenger hunt last year, and even though K had a blast looking for the books, I’m glad I took the lazier route this year.

2016-adventcalendar10 2016-adventcalendar1

This might be one of my favorite handmade advent calendars. It was simple and thoroughly enjoyable to make, looks fantastic, and I love love love that I didn’t include any candy this year. I feel like I’ve finally come up with a combination that blends giving and receiving and meaningful family activities. Happy happy.

2016-adventcalendar4

Wanna see calendars of yore?

2012

2013

2014

2015

So much satisfaction! This is my main Christmas gift to K every year, and it’s such a relief to get it done so early in December. Now onto other holiday gifts…

Have a marvelous weekend, all! It’s a rare snowy day in Seattlle today and school is delayed for a couple of hours. We might have to start the morning with some hot cocoa to warm up!

K adores her stars

Such a joy to create one

Every single year